 (750 × 430 px) – 2023-03-21T151024.451")
You query whether there is a genuine necessity to clean your mechanical keyboard. The experts agree that the answer is unquestionable “yes,” yet many people who frequently use the internet are the worst culprits for ignoring it. Deep Cleaning: Attacks knots and lint that have built up beneath the mechanical keyboard’s surface over time and can cause a sticky coating that harms the keyboard’s function.
Regular key wiping is a wonderful habit to get into. But whether you know it or not, learning to clean under the keyboard is equally crucial. People like doing chores, but if your mechanical keyboard has been cleaned for a while, who knows what residue and other filthy things are hiding beneath?
Don’t Blow Off The Importance Of Cleaning Your Keyboard
Some put off doing their duties, while others are too busy working or playing online games to recognize how important it is to clean the keyboard thoroughly. Then there is the concern of whether improper cleaning of the mechanical keyboard’s bottom might cause more damage than good. Of course, it can, but it will only if you follow the easy directions.
We’ll keep you motivated by outlining some simple actions if you’ve put off maintaining this keyboard or are trying to figure out what to do. Effective for getting rid of dust, stains, food residue, bacteria, and even extraterrestrials. Particles are hiding behind the keys you use every day.
Are you concerned that the grime on your keyboard is hindering performance? This article said:
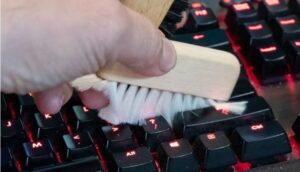
Keys that are too sticky are a clear indication that your keyboard needs to be cleaned. There are many cleaning levels; some people spray a small amount of compressed air and hope for the best. We only like this choice a little due to the possibility of pushing particles further into the keyboard. We want to utilize the optional vacuum brush to remove all the debris. However, the best action is to remove the key and clean it well if there is a major jam issue.
Swiping The Surface Is Great Routine Maintenance—But It’s Just A Start
You’re doing it properly if you often clean the keys’ surface. Many people who use mechanical keyboards on computers don’t even do this. Just consider the times you’ve munched while playing video games. How much food managed to get lost in the cracks? Despite your best efforts to keep food and residue away from the keyboard, dust, grease from cooking, and pet hair can lodge beneath the surface and adhere to one another.
If you cannot recall the last time you came across something odd. Take off the button cover, soak, rinse, and clean each component thoroughly. It’s time to disassemble your mechanical keyboard and give it the thorough cleaning it needs. We’ll help you put the tools together and execute the procedure.
How To Deep Clean Your Mechanical Keyboard Without Stress
So you decided to act. You’ve made an effort. Which cleaning technique is most effective for mechanical keyboards? We mostly experience simplicity. The advice that many people offer makes the procedure appear too difficult. Here, we go over a few of the essentials. For a lint-free, thorough cleaning of your mechanical keyboard.
Step 1: Gather The Tools For The Task
Gathering the necessary tools is the first step in beginning any project. You want to avoid starting over and frantically searching for cleaning supplies. What you need to clean a mechanical keyboard is:
- A flat-blade screwdriver or other key cover remover is a good pry tool.
- A microfiber towel for cleaning the keypad and the board surface.
- Tweezers to remove debris from small areas.
- Cotton wool on a stick, such as cue tips or any other variety.
- Dishwashing liquid or another mild cleaner works nicely to soak and clean the push button.
- A 70% isopropyl alcohol solution is effective as a surface cleaner.
- A vacuum cleaner with a compact and restricted mount.
Step 2: Pop Off The Keycaps
The space bar may be removed in the best method possible when removing the keycaps from a mechanical keyboard. The remaining keys will be much simpler to remove after the keycaps have been taken off the board. The spacebar occasionally extends differently than each pad. In certain instances, the spacebar is supported by a stabilizer bar, a long metal bar. This ensures that every tap on the huge keys presses down equally keycap stabilizer is also a space bar if you remove keycaps using a keycap remover. Everything should go smoothly and quickly. Put a screwdriver under the space bar if it will be used as a prying tool. Lift the bar gently while sliding. The bottom switch’s push-button cover has to be taken off. There will be some sound. It might be necessary to raise the spacebar gradually. To remove it from the hook, pull it left or right.
Here are a few extra keys:
- Enter
- Shift
- Backspace
- 0/inch
- A large “+.”
These could become stuck like the spacebar on some keyboards. The methods for removing the space bar can also be used to remove them.
With regular keys, try placing a keycap remover or screwdriver under each key to pull it off. Some could be simpler to get rid of than others. The container you wish to soak and clean should contain the keys.
With tweezers or another small instrument, you might find it simpler to remove keys connected to a mechanical keyboard chassis, such as the arrow keys.
Step 3: Suck It Up (With A Vacuum)
Make use of your narrowest available vacuum attachment. Instead, a vacuum is made especially for cleaning keyboards.
Before vacuuming, use tweezers to remove as much dust from the entrance as possible. The vacuum cleaner cannot remove hair and other dirt clinging to the surface. But pluck out what you can with tweezers first. It makes sweeping a simple task.
Use the keyboard to operate the vacuum. Avoid this if your ignition switch has a glass sensor to prevent harm. Okay, but exercise the utmost caution. Pay attention to the space between keys while avoiding switches.
Vacuum – Tweezers – Tweezers may be required. Repeat the process if it has been months or years since you last cleansed your computer.
Step 4: Wash The Keys Well
Hot water should be poured into the key cover’s container. You may add dishwashing liquid by sprinkling a little amount on top. Spend many hours soaking. Clean the helmet. All leftovers should be removed using a microfiber cloth.
With a towel, dry the cap. Till the water drains from you, maintain your face-down position. After that, flip it over and leave it to dry for a day or overnight. Each keycap cover must have its whole bottom entirely dry. to guarantee correct operation when contacting delicate components.
Step 5: Clean The Board With Cotton Swabs
To clean the keyboard, dip a cotton swab in isopropyl alcohol. The alcohol, focusing on the area between the keys, will eliminate germs and stickiness and nearly immediately evaporate.
Don’t let any lint get inside the ignition switch. Regularly change the cotton. Focus your attention on the soiled area where the keys are kept. Not the location of the buttons. Your touch can cause the switch to malfunction.
Step 6 (Final Step): Reattach The Keycaps
Reassemble the keyboard once all of the keycaps have dried. Putting the key back in is simpler than taking it out.
Place the keys that need stability first. Other keys are now simpler to enter as a result. First, secure the stabilizer to one side of the key for re-entry. Once the huge button is back on, attach the hook in the other way. Take off each button’s cover.
Going Back To Work Or Play
as soon as the area beneath your keyboard is clear. Then you’re prepared to start a difficult work assignment or have a great gaming night. Mechanical keyboard maintenance should be performed regularly, just like automobile maintenance. Spend some time making plans and doing tasks. But lessens the chance of breaking.